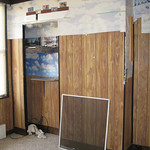
- Front bedroom
This is the larger bedroom, at the front of the house. No real closet, but a shallow storage area. There was also a train layout installed in here, of which remnants were still visible when I took possession (see, e.g., clouds at top of this photo and small photo at right). Good features include the great light that comes through the double windows here!
. 
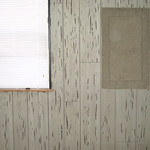
- Rear bedroom
This is the smaller bedroom, which was really very small (and also featured one of those 9-inch-deep closets that plague houses of this area). Hey! new paneling color! Also, inexplicably, a bath rug nailed to the wall next to the window, but why not? Maybe it knew that someday its fate was to become the master bath area of a new and fancy living area...
. 
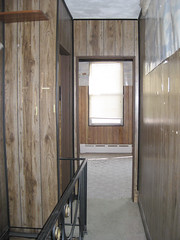
- Hallway
There's not so much magic planned for here, but the breadth and craziness of all that paneling just needs to be documented! I feel like it's difficult for such innocuous spaces to feel this busy, and it will all calm down a lot once it's a nice, neutral, light color. Also notable is that the hallway up here is very narrow -- I hope it will feel less like a tunnel when the bedroom door is a couple of feet closer.
- Roof deck
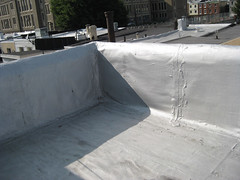 A lot of houses that have added on a kitchen and/or 2nd floor space at some point have "roof deck potential" on the top floor. This house really has a full deck already built, although it's covered only in roof material, without any wooden flooring. Still, that minimizes the effort required to get the rest of the way, and we're definitely going to do it. The current deck has one major con and one major pro:
- Con: condition of the door!
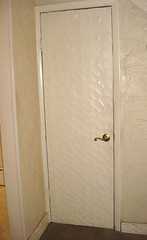
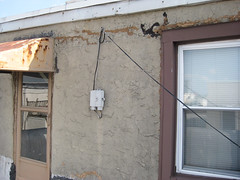 As you can see from this photo, there's a battered metal awning over the roof deck door, and it interferes with the action of the door and clearance for your head. But the reason that it was put there quickly became apparent in looking a bit closer at the door itself, which appears to have been just inserted into a gap in the brick without any framing or sealant!
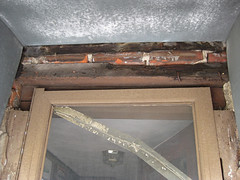 Here you can see under the awning, the exposed brick (where stucco should be) and the exposed boards (where a doorframe should be). More of this issue can be seen, e.g., at the lower corner shown in the smaller pic at right.
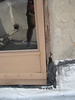 In addition to just being... inconceivable, this raw finish led to a lot of water problems through the years, as also hinted by the inside face, where previous residents had stuffed rags in an attempt to keep water from blowing in under the storm door during rains. My contractor has made a lot of noise about what needs doing to better protect this sill,
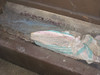 but it's clear that basically the entire doorway must be rebuilt, for real functional purposes as well as because it just looks like crap the way it is...
 - Pro: the view!
Really, any roof deck is nice, especially for parties, but also for nice autumn afternoons and all the rest. But you really feel like you're living it up when you get a glimpse of the city skyline, and here you pretty much have it all lined up in spades! (For the view downward, a European jumble of back yards and crazy wiring, see this.)

- Con: condition of the door!
Thursday, August 28, 2014
Before III: Third floor
The third floor is where things are really going to change. It starts out with two small, dated bedrooms and a crumbly roof deck exit, and will end up with a master bedroom suite including a bedroom, large closet, and upscale bath. My first opportunity to rearrange walls! w00t!
Saturday, August 23, 2014
Before II: Second floor
Ok, now for the second floor, home of two reasonable bedrooms and the house's only starting bathroom.
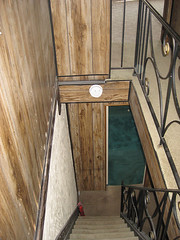
- Bedrooms: Now we are into the realm of fake paneling, drop ceilings, and carpets whose semi-shag profiles might take you back to bad memories of 1978. First up is a sizeable bedroom that has the odd feature of being very long (nearly 20 feet!) and thin. On the left side as you enter, there is room for a queen bed and a nightstand without much to spare (two nightstands if you go double bed instead), but then to the right there's the same amount of room again, with the closet and space for a desk and probably a beanbag or two by the windows. (The loose piece of paneling covered a chimney-soffit between the halves which I impatiently tore open; it has lots of space for running ducts and other goodies between the floors.) Here, removing the drop ceiling will gain us a foot or more, but the two halves are at different heights, so we will have to decide whether to make it all the same, or to frame around the break and get extra headroom by the windows. It's a great room, however we handle it, and makes the whole house feel bigger than it is. Opening it all up and painting it a light color will really put it over the top. Also on this floor is a more standard bedroom that suffers mostly from dark curtains, carpet, and trim (the "rustic" stuff stained nearly black). We'll also open up a chunk of space on one side of the chimney that was needlessly framed in, and also a couple feet of extra vertical space above the closet, which will probably become cupboards in one of the two bedrooms. And, you know, paneling and stucco and dropped ceiling surgery... Here's the other side of that same room, showing the closet (which continues beyond the wall on the left end a couple of feet!) and its mirrored doors. This room can be easily saved from itself, although it will never be a particular show-stopper. Right outside this second bedroom are the stairs to the third floor, which continue the dark trim. These stairs are a little steeper than the main stairs, but not anything like the stairs found in Philadelphia trinities, which need a vertical grip bar and a strong sense of confidence to climb. The main problem with these is that the carpet and padding tilt you back as you step on each step -- can't wait to rip it off so one doesn't feel in constant danger of tumbling over backward. Once the steps are wood again, I think they'll be fine to climb to the master suite. And look a little more welcoming.
- The bathroom: This is the sole bathroom that served a family of eight! A vanity fits just inside the door to the right, which is walled in by the back of the shower (slightly under standard size, with a 54-inch tub base), and the toilet is fit into a little niche on the left. There's so little space to spare that even the baseboard radiator seems to be encroaching visually here. Unfortunately, there's not much we can do without screwing up the sewage lines and/or stealing most of the closet from the long bedroom. So I just plan to update the feel of the place, trying out some Ikea fixtures (going for a bit of this spa look), and make it visually larger by carving back the edge of the shower wall to let you see beyond. In the end, this will be the secondary bathroom of the house, so I think it's ok that it will continue to be tight for whatever kids or guests end up using it on a regular basis, but I want to do the most I can to make it feel a little fancy here and there. Here's the current vanity, which is perfectly serviceable but uninspired. Just visible in the lower left of the shot is the current access panel for the shower plumbing, which makes it such that the vanity can't fill even the space available to it. Since we won't tile this side of the wall, we won't need an access panel (just cut the drywall if you need in, and patch afterwards), so I can put a 30- or 36-inch vanity into this 42-inch space, rather than a puny 24-incher. Other bonus plans -- get the light switch out of the interior of the medicine cabinet!!! (The only thing crazier than that placement is the switch for the patio light that's located inside a kitchen cabinet nearby. Whee!) Actually, the bathroom is one of the places needing actual repairs -- a crack in the rear stucco wall clearly led to water leakage into the space behind the fiberglass shower enclosure, with the result that eventually plaster crumbled and pushed the enclosure away from the wall. The damage was also visible at the top of the shower, but I guess it didn't bother the residents enough to do anything about it -- they were living here until a few months ago! We'll be repairing the wall from both outside and inside before we put a new shower and tub here. These are the kinds of low-glamor repairs that make you feel proud to settle a new family into the house, knowing that they won't run into trouble in years ahead.

Before I: First floor
Ok, let's get a look inside and see what we started with here.
- Living room/dining room space:
 The other notable feature of this floor is the door to the basement, which has an ornate veneer designed to match the rustic trim theme (a close-up of this work of art is here). We'll be taking this whole door frame apart anyway to make it a bit wider, so a new door is trivial by comparison. Not expecting much of an after-market for this one though!
 - Kitchen: This is the listing picture of the kitchen; the fisheye lens allows it to show almost the whole thing in one shot.
Thursday, August 7, 2014
House #2: Euro-kitchen house
 Yes, indeed, House #2 is on the books, and planning is well underway! Its name comes from the cool new cabinet line I'll be trying out in the kitchen, but we'll be doing a lot in this house, so I want to get the basic introductions out of the way.
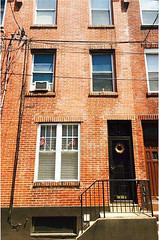
From the front shot (listing), you can already see some differences from my last house: no awnings and a third story. The latter feature is going to let me test my chops on converting a couple of small bedrooms into a master bedroom suite, which is an approach I have considered for a number of houses, so will be glad to finally dig into. Aiming for some spiffy modern finishes, so excited to see it take form!
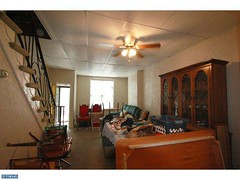
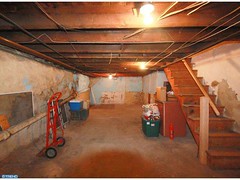
On other fronts, you can see that the living room has textured stucco and a dropped ceiling, which give a good sense of the place -- lots of those, and also faux-wood paneling that was the height of 1970s style. The basement in this house is completely unfinished cement (part of which used to house an extensive model train set-up), another feature I expect to change. Have been taking photos, drawing floorplans, and talking to contractors, so will start to show more of what I'm planning soon.
Yes, indeed, House #2 is on the books, and planning is well underway! Its name comes from the cool new cabinet line I'll be trying out in the kitchen, but we'll be doing a lot in this house, so I want to get the basic introductions out of the way.
From the front shot (listing), you can already see some differences from my last house: no awnings and a third story. The latter feature is going to let me test my chops on converting a couple of small bedrooms into a master bedroom suite, which is an approach I have considered for a number of houses, so will be glad to finally dig into. Aiming for some spiffy modern finishes, so excited to see it take form!
On other fronts, you can see that the living room has textured stucco and a dropped ceiling, which give a good sense of the place -- lots of those, and also faux-wood paneling that was the height of 1970s style. The basement in this house is completely unfinished cement (part of which used to house an extensive model train set-up), another feature I expect to change. Have been taking photos, drawing floorplans, and talking to contractors, so will start to show more of what I'm planning soon.
Subscribe to:
Posts (Atom)