Monday, September 1, 2014

Demo I: First floor chaos

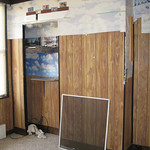
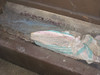
Well, when demo gets underway, it's a rush of destruction, with lumber, brick, and rolls of carpet piling up at the bottom of the stairs. I wasn't even sure the guys had started yet when I visited the house and was greeted by this:

LR_lumber3

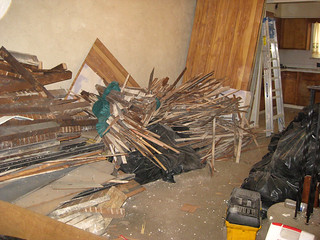
Needless to say, they were well underway pulling out the fake wood paneling and other crumbling bits upstairs. It probably took a week or more overall (with separate stops for, say, giving all the kitchen cabinets to Habitat), but it's just a stream of brick-filled bathtubs out into invisible trucks meantime...

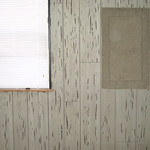
Here are a couple more shots of the rubble:
LR_lumber1 . LR_lumber2

But a lot of the transformation is in the details.kitchen_nocabinets_C 
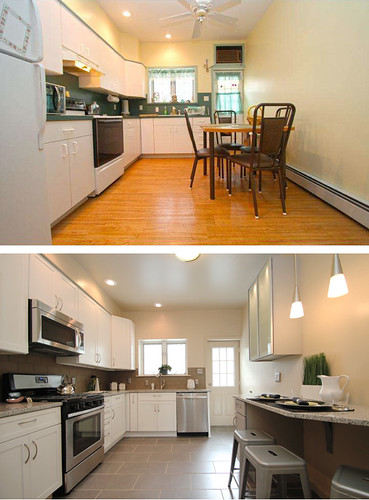
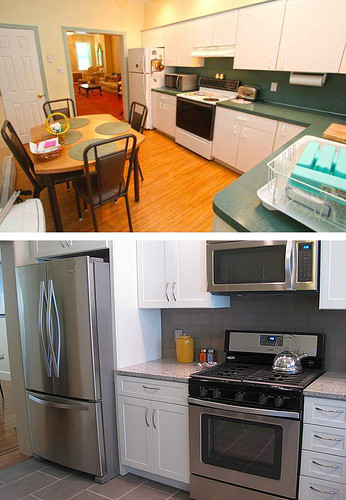
For example, here (left) is the main wall of the kitchen with no cabinets! Not clear if we're seeing discoloration on the lower section back there or just something before the last paint color, but anyway, kitchen_nocabinets_L
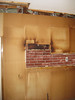
there were also suspended bits of fake brick attached in midair, which I enjoy. (Honestly, I enjoy seeing the bones behind everything.)

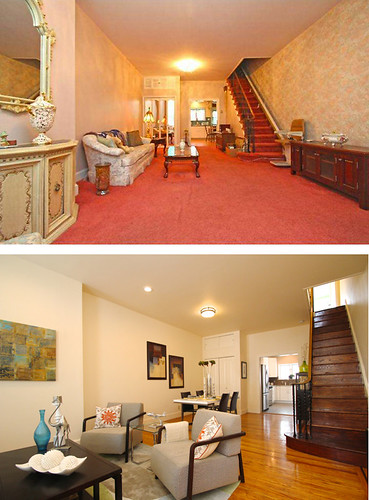
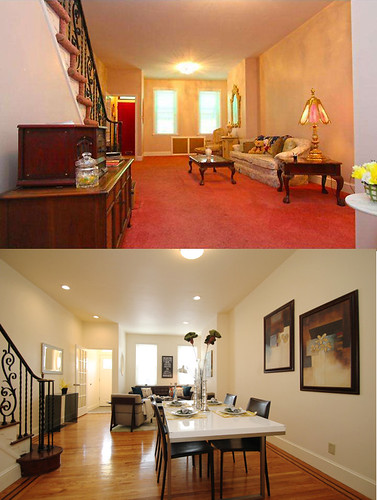
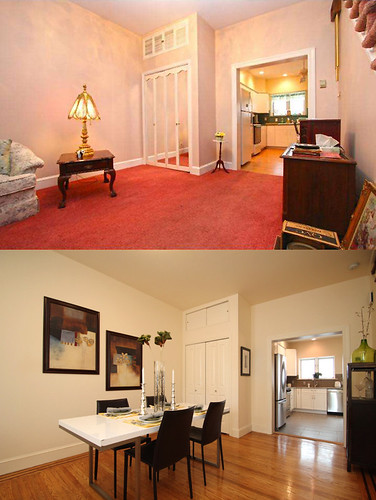
Here's some other stuff going on around the first floor. First, have seen the wood under all that carpeting, and it's pretty nice -- no inlay this time, but seems like it will clean up well, which is great.LR_floors The photo at right is a partial view under the demo dust, but the whole under-padding has been rolled back now, and it seems like there are just some mild discolorations in the diningroom area, so I'm hoping that it's all amenable to a light sand and stain -- will be consulting with my contractor to confirm this week.stairs_nocarpet
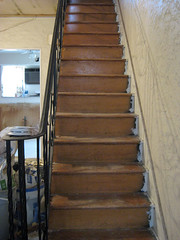
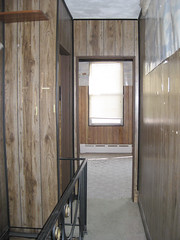
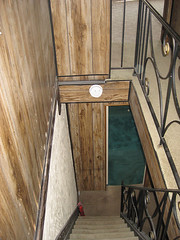
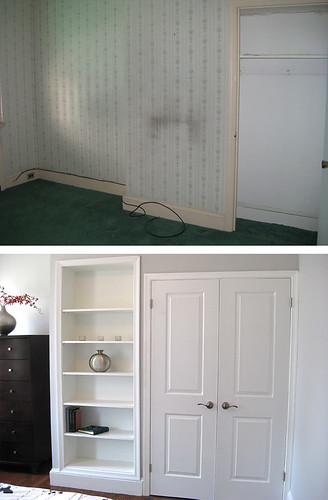
The next pic is of the de-carpeted stairs, which look mostly great, although originally there were more bars in the bannister, so we may have to decide whether to plug the resulting notches or not. Wood-wise, though, it's all very promising, for which my pocketbook is grateful. The hallways seem similarly ok, although there's been some wear (and some eras of paint!) up there. Bedroom floors are a different story, which I'll cover when I get up there.

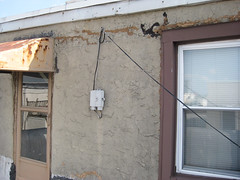
The biggest development on the first floor happened toward the very end of last week, when the vestibule was pulled out (see prev. view here). It looks a little crazy with that wiring dangling where it used to be embedded in a wall, but the space immediately feels bigger and more natural, so I'm very excited about this choice and how things will look when we patch it all up again.

vestibule_gone

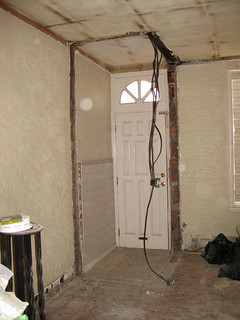
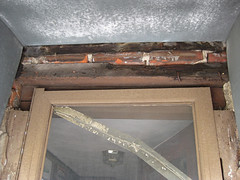
Not to mention actually getting the benefit of light from that transom window! All very nice. Anyway, most of the crazy stuff is done and the magical specialists of electricity, plumbing, and HVAC are working their wiles this week while all the walls are wide open, before the drywalling starts up the following week. No sitting around on this project! Deadlines will be kept! (yay!!)

Thursday, August 28, 2014

Before III: Third floor

The third floor is where things are really going to change. It starts out with two small, dated bedrooms and a crumbly roof deck exit, and will end up with a master bedroom suite including a bedroom, large closet, and upscale bath. My first opportunity to rearrange walls! w00t!
  • Front bedroom

    This is the larger bedroom, at the front of the house. No real closet, but a shallow storage area. There was also a train layout installed in here, of which remnants were still visible when I took possession (see, e.g., clouds at top of this photo and small photo at right). Good features include the great light that comes through the double windows here!

    . 3rdfl_backbr
  • Rear bedroom

    This is the smaller bedroom, which was really very small (and also featured one of those 9-inch-deep closets that plague houses of this area). Hey! new paneling color! Also, inexplicably, a bath rug nailed to the wall next to the window, but why not? Maybe it knew that someday its fate was to become the master bath area of a new and fancy living area...

    . 3rdfl_frontBR2

  • Hallway

    There's not so much magic planned for here, but the breadth and craziness of all that paneling just needs to be documented! I feel like it's difficult for such innocuous spaces to feel this busy, and it will all calm down a lot once it's a nice, neutral, light color. Also notable is that the hallway up here is very narrow -- I hope it will feel less like a tunnel when the bedroom door is a couple of feet closer.

    3rdfl_hall . stairs_from3

  • Roof deck

    roof_deck_coatingA lot of houses that have added on a kitchen and/or 2nd floor space at some point have "roof deck potential" on the top floor. This house really has a full deck already built, although it's covered only in roof material, without any wooden flooring. Still, that minimizes the effort required to get the rest of the way, and we're definitely going to do it. The current deck has one major con and one major pro:

    • Con: condition of the door!

      roof_deck_wallAs you can see from this photo, there's a battered metal awning over the roof deck door, and it interferes with the action of the door and clearance for your head. But the reason that it was put there quickly became apparent in looking a bit closer at the door itself, which appears to have been just inserted into a gap in the brick without any framing or sealant!

      roof_door_unframingHere you can see under the awning, the exposed brick (where stucco should be) and the exposed boards (where a doorframe should be). More of this issue can be seen, e.g., at the lower corner shown in the smaller pic at right.roof_door_unframing2In addition to just being... inconceivable, this raw finish led to a lot of water problems through the years, as also hinted by the inside face, where previous residents had stuffed rags in an attempt to keep water from blowing in under the storm door during rains. My contractor has made a lot of noise about what needs doing to better protect this sill,roof_deck_rags but it's clear that basically the entire doorway must be rebuilt, for real functional purposes as well as because it just looks like crap the way it is...
    • Pro: the view!

      Really, any roof deck is nice, especially for parties, but also for nice autumn afternoons and all the rest. But you really feel like you're living it up when you get a glimpse of the city skyline, and here you pretty much have it all lined up in spades! (For the view downward, a European jumble of back yards and crazy wiring, see this.)

      roof_deck_view

      That's one feature of this house that won't need fixing up, and I hope that soon the interior will be just as gorgeous. Stay tuned for a mix of more Before and the start of Demo!

Saturday, August 23, 2014

Before II: Second floor

Ok, now for the second floor, home of two reasonable bedrooms and the house's only starting bathroom.

  1. Bedrooms:

    Now we are into the realm of fake paneling, drop ceilings, and carpets whose semi-shag profiles might take you back to bad memories of 1978. First up is a sizeable bedroom that has the odd feature of being very long (nearly 20 feet!) and thin. On the left side as you enter, there is room for a queen bed and a nightstand without much to spare (two nightstands if you go double bed instead), but then to the right there's the same amount of room again, with the closet and space for a desk and probably a beanbag or two by the windows. (The loose piece of paneling covered a chimney-soffit between the halves which I impatiently tore open; it has lots of space for running ducts and other goodies between the floors.)


    Here, removing the drop ceiling will gain us a foot or more, but the two halves are at different heights, so we will have to decide whether to make it all the same, or to frame around the break and get extra headroom by the windows. It's a great room, however we handle it, and makes the whole house feel bigger than it is. Opening it all up and painting it a light color will really put it over the top.

    Also on this floor is a more standard bedroom that suffers mostly from dark curtains, carpet, and trim (the "rustic" stuff stained nearly black). We'll also open up a chunk of space on one side of the chimney that was needlessly framed in, and also a couple feet of extra vertical space above the closet, which will probably become cupboards in one of the two bedrooms. And, you know, paneling and stucco and dropped ceiling surgery...

    Here's the other side of that same room, showing the closet (which continues beyond the wall on the left end a couple of feet!) and its mirrored doors. This room can be easily saved from itself, although it will never be a particular show-stopper.

    Right outside this second bedroom are the stairs to the third floor, which continue the dark trim. These stairs are a little steeper than the main stairs, but not anything like the stairs found in Philadelphia trinities, which need a vertical grip bar and a strong sense of confidence to climb. The main problem with these is that the carpet and padding tilt you back as you step on each step -- can't wait to rip it off so one doesn't feel in constant danger of tumbling over backward. Once the steps are wood again, I think they'll be fine to climb to the master suite. And look a little more welcoming.

  2. The bathroom: This is the sole bathroom that served a family of eight!

    A vanity fits just inside the door to the right, which is walled in by the back of the shower (slightly under standard size, with a 54-inch tub base), and the toilet is fit into a little niche on the left. There's so little space to spare that even the baseboard radiator seems to be encroaching visually here. Unfortunately, there's not much we can do without screwing up the sewage lines and/or stealing most of the closet from the long bedroom. So I just plan to update the feel of the place, trying out some Ikea fixtures (going for a bit of this spa look), and make it visually larger by carving back the edge of the shower wall to let you see beyond. In the end, this will be the secondary bathroom of the house, so I think it's ok that it will continue to be tight for whatever kids or guests end up using it on a regular basis, but I want to do the most I can to make it feel a little fancy here and there.

    Here's the current vanity, which is perfectly serviceable but uninspired. Just visible in the lower left of the shot is the current access panel for the shower plumbing, which makes it such that the vanity can't fill even the space available to it. Since we won't tile this side of the wall, we won't need an access panel (just cut the drywall if you need in, and patch afterwards), so I can put a 30- or 36-inch vanity into this 42-inch space, rather than a puny 24-incher. Other bonus plans -- get the light switch out of the interior of the medicine cabinet!!! (The only thing crazier than that placement is the switch for the patio light that's located inside a kitchen cabinet nearby. Whee!)

    Actually, the bathroom is one of the places needing actual repairs -- a crack in the rear stucco wall clearly led to water leakage into the space behind the fiberglass shower enclosure, with the result that eventually plaster crumbled and pushed the enclosure away from the wall. The damage was also visible at the top of the shower, but I guess it didn't bother the residents enough to do anything about it -- they were living here until a few months ago! We'll be repairing the wall from both outside and inside before we put a new shower and tub here. These are the kinds of low-glamor repairs that make you feel proud to settle a new family into the house, knowing that they won't run into trouble in years ahead.

That's it for the second floor. Later this week I'll have a stab at the third floor, where the most structural work will happen, and at the basement, whose fate is still somewhat in the hands of city permit/inspector folks. Then it's on to demo and chaos!!

Euro-kitchen House summary page

A chronological list of all the posts for this project:
    front
  1. Introduction
  2. Before I: First floor
  3. Before II: Second floor bedrooms and bath
  4. Before III: Third floor
  5. Demo I: First floor
  6. Some structural work
  7. A kitchen story: Part I (in progress)
  8. A kitchen story: Part II (the reveal)
  9. A story of floors
  10. The living room/dining room story
  11. Second floor I: Bedrooms

Before I: First floor

Ok, let's get a look inside and see what we started with here.
  • Living room/dining room space:

    Here's the livingroom/diningroom area as viewed from the far end of the room looking back toward the front. This house is a little shorter than the last one, so we'll be taking out that vestibule to open up the room a bit more (giving, say, room for an entryway table on the wall currently hogged up by the vestibule door).

    Here's a closer look at the doomed vestibule --- we'll replace it with a square or curve of tile set into the wood floor --- and the stair railing, which is pretty cute. Also visible in this shot is the densely textured plaster wall surface that is all over this level, and the "rustic" trim boards along the stairs, which are used everywhere for baseboards and trim. (Thank you, 1970s!) Those will be going, along with the carpet. There appears to be decent wood under there, but we'll have to pull the whole rug up to be sure, which will wait for the worst of the demo to go by...

    If you pivot toward the right, you get to the dining room area. This shot gives a view of the office-style drop ceiling that is on every floor of this house (and will be going) -- on some floors we'll reclaim a foot or more of ceiling by removing it, although on this floor it's just a few inches. That ceiling fan will also go, as the room isn't that large and the visual space is more valuable than a bit more circulation (which a new furnace and A/C will improve anyway).

    Below is a view of the stairs from the front door. You can see the stucco and drop ceiling again, and also get a first glimpse of the faux wood panelling that starts on the second floor.

    basement_door The other notable feature of this floor is the door to the basement, which has an ornate veneer designed to match the rustic trim theme (a close-up of this work of art is here). We'll be taking this whole door frame apart anyway to make it a bit wider, so a new door is trivial by comparison. Not expecting much of an after-market for this one though!
  • Kitchen: This is the listing picture of the kitchen; the fisheye lens allows it to show almost the whole thing in one shot.

    As you can see, it's pretty livable, but also dated. The cabinets are quite short, given that there's a soffit under an already-low ceiling, and the doors, while quite stylish in 1968 or whenever, are oddly small by current standards and damaged in places. There's also no room for a dishwasher as arranged, so I was always ripping this out (and even budgeted for a new kitchen this time, heh), especially since I'm aiming for a higher trim-line on this house, which means KITCHEN KITCHEN KITCHEN (and MASTER BATH too). I hope that somebody from Habitat will find a good use for them, since the wood is quite nice.

    Here's a closer view of the left side of the kitchen. The built-in oven is quite small inside (amazingly so for the size of the family who lived here!), although having a wall oven and stove-top is an approach that's quite contemporary. (The oven itself is pure Jetsons in look -- wish I could find a vintage-lover to give it a new home.) The faux-brick backsplash here is pretty much the opposite of contemporary... Interestingly, it turns out that this entire wall of the kitchen stands out about 7-8 inches from the equivalent wall on the living room side -- I suspect that there's just one chimney back there, but I guess it's easier to build everything forward than to make use of additional space in only a subset of the space. Will have to see where everything falls when we get into the walls there, but unless the fridge can be pushed deeper, we'll probably be in the same situation. The new kitchen will follow this same general footprint, but with a regular range rather than these deep oven cabinets; hopefully the 42-inch cabinets will make up for any loss of storage in the exchange!

    This is the center wall of the kitchen. The biggest change for the feel of the place will be getting that huge A/C unit out of there (replaced with a dainty floor register) and getting a full-sized set of windows in there; should really be bright and welcoming! Will also be glad to rip off that granny trim -- it currently hides a set of lights, but we'll have recessed lighting over the sink and counters, so it shouldn't be missed. Also, bigger sink, higher modern faucet, dishwasher, blah blah blah. :)

    And here is the right-hand side of the kitchen! Not much to it currently, although they probably put a second table and chairs here. Getting those registers out means that we can reconsider the use of this wall for built-in stuff, and it will basically be a nice long breakfast bar when I'm done with it. Am doing quartz countertops this time, so no trip to the granite yard, but should be a striking piece of stone.

    This angle on the rear-right corner demonstrates why I can consider doing something with this side of the kitchen: because the door to the basement opens in the living room, there is a wide wall here (nearly four feet), and I'm going to put a hypermodern array of cabinets and fancy bits in there, leading into the nice breakfast bar -- my kitchen design guy at Lowes loves my take on this space so much that he plans to show it off as proof that they were right to carry this mod line of cabinetry! (The picture that captured/inspired my vision is this design at Houzz.) Can't wait to see it take shape -- will leave some of the bells and whistles for surprises in the After pics.

    So, that's the first floor. Will take you on a tour of the upper floors in my next installment.

Thursday, August 7, 2014

House #2: Euro-kitchen house

frontYes, indeed, House #2 is on the books, and planning is well underway! Its name comes from the cool new cabinet line I'll be trying out in the kitchen, but we'll be doing a lot in this house, so I want to get the basic introductions out of the way.

From the front shot (listing), you can already see some differences from my last house: no awnings and a third story. The latter feature is going to let me test my chops on converting a couple of small bedrooms into a master bedroom suite, which is an approach I have considered for a number of houses, so will be glad to finally dig into. Aiming for some spiffy modern finishes, so excited to see it take form!

On other fronts, you can see that the living room has textured stucco and a dropped ceiling, which give a good sense of the place -- lots of those, and also faux-wood paneling that was the height of 1970s style. The basement in this house is completely unfinished cement (part of which used to house an extensive model train set-up), another feature I expect to change. Have been taking photos, drawing floorplans, and talking to contractors, so will start to show more of what I'm planning soon.

LR_forward basement

Thursday, June 19, 2014

Before and after comparisons

I have many pictures of various parts of the house in their Before state (and also in states of demolition), and the listing pics have most of the Afters. But there's still a lascivious joy in seeing them side by side, so you can really see the transformation. This house was in good shape right from the start, so we didn't move so many walls or fix up so much damage, but still, the amount of work that goes into modernization is nontrivial! Even the kitchen, which had white cabinets and semidecent flooring going in, seems transformed by the newer versions of everything, and it's certainly better designed and more sturdily built than it was! Anyway, I know you want to see the photos, so here they are.

front_whole_BA
The front. Main changes are removal of awnings and white grilles, but under all that are a new door and more air-tight glass brick basement windows. Plus a porch light and a general freshening up of all surfaces.

front_door_BA
Front door, for completeness and so you can see the new house number plaque.

LR_longview_BA
Long view of livingroom. Most obvious is removal of all that carpet, mirrored doors, and crystal-laden lighting. Also goodbye to the wallpaper and hello to a sunny coat of paint. You can also see a motorized lift running up the stairs in the top pic, which got removed along the way.

LR_forward_BA
Here's the reverse view, where you can really appreciate the refinished floors and the additional light granted by the removal of the awnings.

Dining_room_BA
This DR photo is a bit redundant, but I included it because I had the Before shot from the original listing and our real estate photographer took the same angle. Also good for seeing how we replaced all the closet and cupboard doors, and for a glimpse of the kitchen(s) beyond.

kitchen_main_BA
And there's the kitchen: fake wood replaced with tile, extra-tall cupboards, new breakfast bar, and all the rest. This is one of the places that we reap the benefits of having taken out the baseboard radiators (in converting to a forced-air furnace). Made me really happy to take down those little curtains too.

kitchen2_BA
Another kitchen view -- my After doesn't have the fisheye lens that the listing photographer used, but you get the idea. (Still loving how that floor looks, and how all the finishes work together!)

kitchen_sink_BA
Yes, there was really a white sink before. Not anymore! I worried briefly that the brown glass backsplash would be too dark, but it ended up just perfect -- striking, but basically neutral. yay! Also, loving how the granite looks in person.

patio_BA
The patio really shows its improvements, although most of what made the original look so dingy was just peeling paint. Still, that's the business of making a house "move-in ready" -- taking care of all those details that make the difference between "finished" and "needs work".

BR1_BA_double
Master bedroom -- you immediately notice the removal of the awnings, wallpaper, and carpet. Invisible is the rebuilding of the left-hand wall, which was hanging in a state free from any supporting studs! You really find some odd things working with rehabs. Anyway, all solid now and ready for hanging pictures.

BR1_closet_BA
And, of course, the useless 6-in-deep closet in the MBR is now a real (fabulous) closet with a built-in bookcase. Those shallow closets are a killer from both a sales and utility perspective, so this is the kind of fix that makes me feel good about doing this kind of work -- like I'm radically improving the livability of the place.

BR2_BA
And, speaking of livability, making sense of this ridiculous room was one of my prime motivations in buying this house. Looks a whole lot more usable now!

BR2_windowseat_BA
The Inexplicable Tunnel becomes a normal space with a spiffy window seat (even without the fish-eye lens). Settle in with a good book!

BR3_BA
Third bedroom gets some closets and other love (including shiny wood hidden by that area rug). I'm still amazed that they staged it at this off angle, but it does make for a striking photo from teh doorway, so they probably know more than I do. For living, I'd want my bedroom against the doorway wall, facing the closet-framed window...

Bath1_BA
Upstairs bath. You almost can't believe that the wall tile was already there.

basement2_BA
Basement -- the facelift gets a bit more intensive down here, where every single surface was ripped out and replaced. Especially glad with how nice the carpet came out, but honestly, the biggest lifetime improvement to the place was probably removing the crazy plaster-and-wire ceiling and all the homemade wiring conections that were hidden behind it. That and enclosing all the explosed pipes and meters in the corner with the laundry. All tidied up now!

basement_BA
Family room was already finished, but opening up the doorway and updating all the finishes really make the whole basement feel bigger and be more useful. Even a new closet down there for off-season clothes or other stuff...

Bath2_BA
Finally the basement bath, mostly a facelift, although the original had plastic-like wallboard all the way around (see seams in top pic), so getting that out was really great. Plus, the new glass brick window lets in more light, vents better, and keeps the winter winds out -- an improvement on many fronts. This was also my first real experiment with a sort of fashion look that isn't really a reflection of my own usual taste; in particular, I think pedestal sinks are just a waste of potential storage most of the time, but in a house like this with so many closets and another full bathroom, it was fun to try out this kind of look. I think it worked out well. This photo really looks like my design board too!


So, that's about it! Not sure if I want to blog much about the business side of things, but let's just say that the house is under contract and I'm making a few small fixes in response to the home inspection. Hopefully the deal will be done in another couple of weeks and I can start making plans for the next one!

Tuesday, June 17, 2014

Listing pics II: Upstairs and Downstairs

Ok, more listing pics! We continue our tour by going downstairs from the kitchen into the basement...

13=IMG_8068
View from the base of stairs, including open space staged as office,
bathroom, and laundry area (furnace and storage closets at right).

14=IMG_8066_after
Main (rear) room of basement, the family room.

15IMG_8072
Full bath in basement, designed with a masculine slant.


Finally, we go upstairs to see the three bedrooms and main bath, now full of furniture and doo-dads, shiny floors under area rugs. I feel like somebody already lives here!

16=IMG_8074
Rear bedroom, staged off-axis with a queen bed.

17=IMG_8080
Main bath. No idea how the real estate photographer managed this angle!

18=new_bath1
Direct view of vanity, truer to color, and love that mosaic tile!!

19=IMG_8082
Middle bedroom, staged with a twin bed.

20=IMG_8081
Middle bedroom window seat. So inviting!!

21A=MBR_windows_staged
Finally, the fabulous master bedroom (staged with a king-sized bed)!

21B=IMG_8089
Another view of the master bedroom.

22=new_MBR1_bookcase
Showcase wall with new fancy closet and bookcase.


23=new_MBR2_closet

And yes, those beautiful french doors inspired me to find some inexpensive but fabulous closet hardware to really bring this up a level. Looks like a million bucks in there!

Well, some other folks must have loved the new face of this house as much as I did, because we had seven showings the first day and a steady trickle thereafter. Hopefully all the inspections will go smoothly, and it will soon have new residents!

Hopefully I'll find time/headspace soon for the direct before-and-after comparisons, but I think we can agree that After was pretty darn satisfying! :)